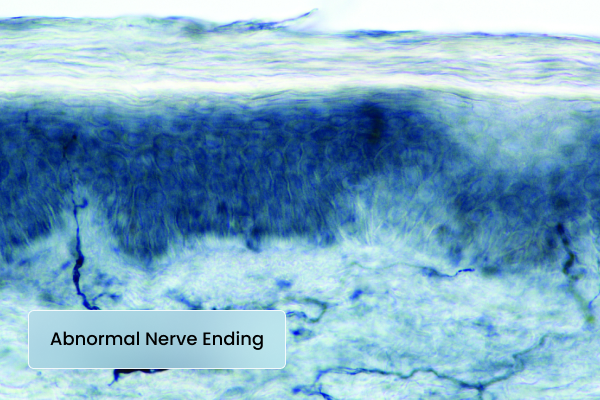
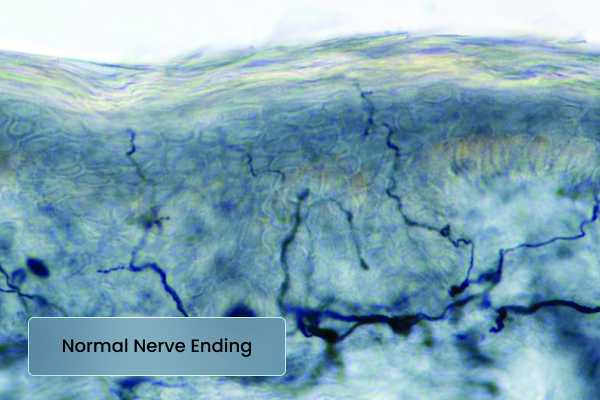
Epidermal Nerve Fiber Density (ENFD)
Diagnostic Accuracy
Specialized Small Fiber Neuropathy Testing
Epidermal nerve fiber density (ENFD) testing can lead to a more accurate diagnosis of the underlying cause of neuropathy. This is why each case undergoes comprehensive evaluation by both a neuromuscular neurologist and dermatopathologist, ensuring highly specialized interpretations of patient specimens.
Following a thorough examination of epidermal nerve fiber density by a board-certified neurologist, ensuring a highly sensitive and specific analysis of sensory nerve function, one of our esteemed board-certified dermatopathologists reviews the skin histology of each specimen. This meticulous examination checks for any evidence of small vessel vasculitis or other histologic abnormalities.
Our collaborative physician team is committed to providing the most accurate diagnostic small fiber neuropathy testing available to ensure each patient receives the best possible care.
Defining Isolated Small Fiber Neuropathy
Patients who present with sensory neuropathic complaints but have a normal neurological exam and normal nerve conduction studies (NCS) may still be suffering from neuropathy. In these cases, there is no large fiber involvement, making the diagnosis more challenging. To accurately detect and confirm peripheral nervous system pathology, additional specialized testing is often required.
For these patients, small fiber testing methods are essential. These include intra-epidermal nerve fiber density (ENFD) testing, sweat gland analysis, QSART (Quantitative Sudomotor Axon Reflex Testing), and autonomic reflex testing. These approaches help uncover isolated small fiber neuropathies, which are essentially “small fiber only” variants of broader neuropathies that can affect both small and large fibers. By leveraging these advanced diagnostic techniques, physicians can achieve a more accurate diagnosis and guide patients toward the right treatment options.
Diagnostic Algorithm for Evaluation
NON-LENGTH DEPENDENT FORM: ISFN-1

1. Rust et al, Arthritis Care research 2011 Sept 63(9) 1339-1344
2. Kizawa et al, J Neural Neurosurg Psychiatry; 2006 Aug 77(8) 967-69
3. Antoine et al, J Neural Neurosurg Psychiatry; 2015 86(12) 1347-55
4. Levine T et al, RRNMF Neuromuscular Journal 2020 1(4) 18-23
5. Sinnreich et al, Neurology 2004 63(9) 1662-1669
LENGTH DEPENDENT FORM: ISFN-2
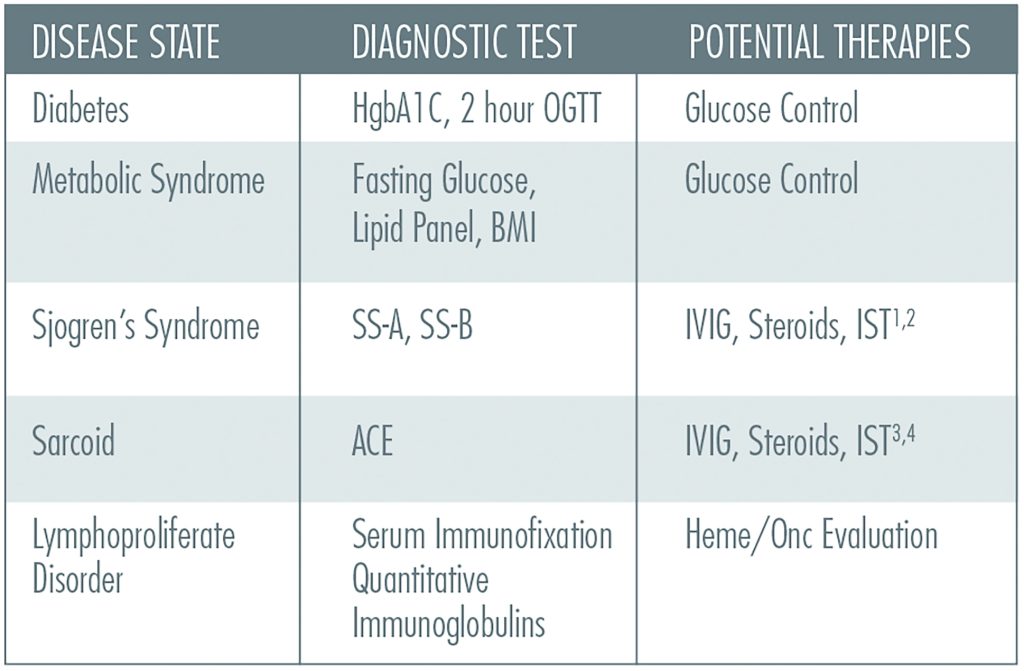
1. Rust et al, Arthritis Care research 2011 Sept 63(9) 1339-1344
2. Kizawa et al, J Neural Neurosurg Psychiatry; 2006 Aug 77(8) 967-69
3. Parmbil, JG et al, Respir Med 2011 Jan 105(1) 101-5
4. Tanzee J et al, Respir Med 2017 May 126; 135-138
MULTI-FOCAL PRESENTATION: ISFN-3
1. Nicolle, MW. Muscle and Nerve. 2001, 24(3) 438-43
2. Tavee, JO. Respir Med 2017: 126: 135-138
3. Pavesi, J. Ital J Neurol Sci. 2004 15(8) 433-436
4. Benstead TJ, Cochrance Database Syst Rev 2014 20(12)
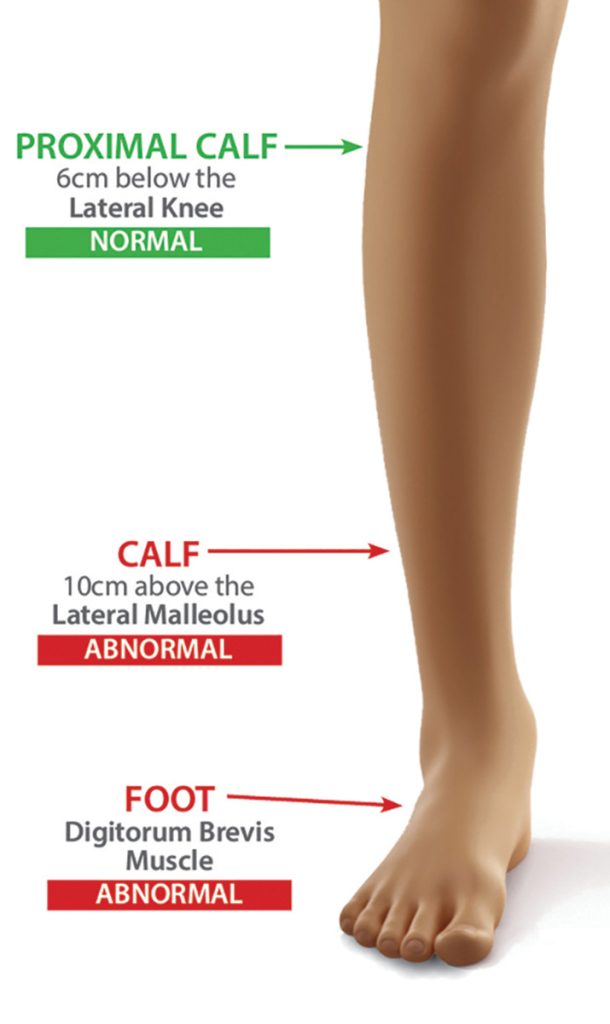
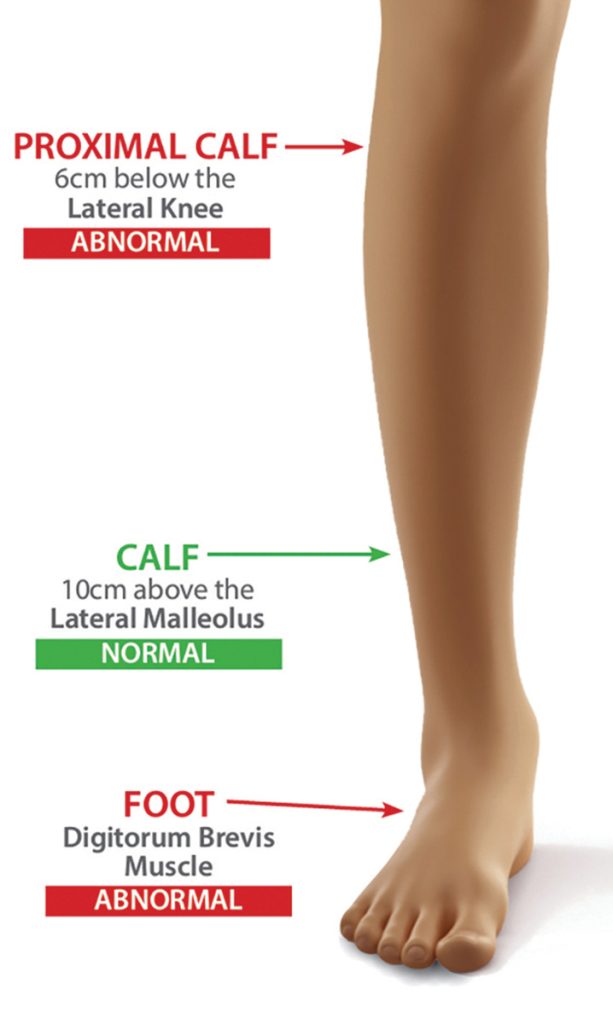
A detailed analysis of 3 sites examining intra-epidermal nerve fiber density can allow for appropriate classification (refer to images and charts below)
By analyzing these areas, one can determine where the greatest pathology can be found
These define unique clinical phenotypes which dictate the most likely causes for neuropathy
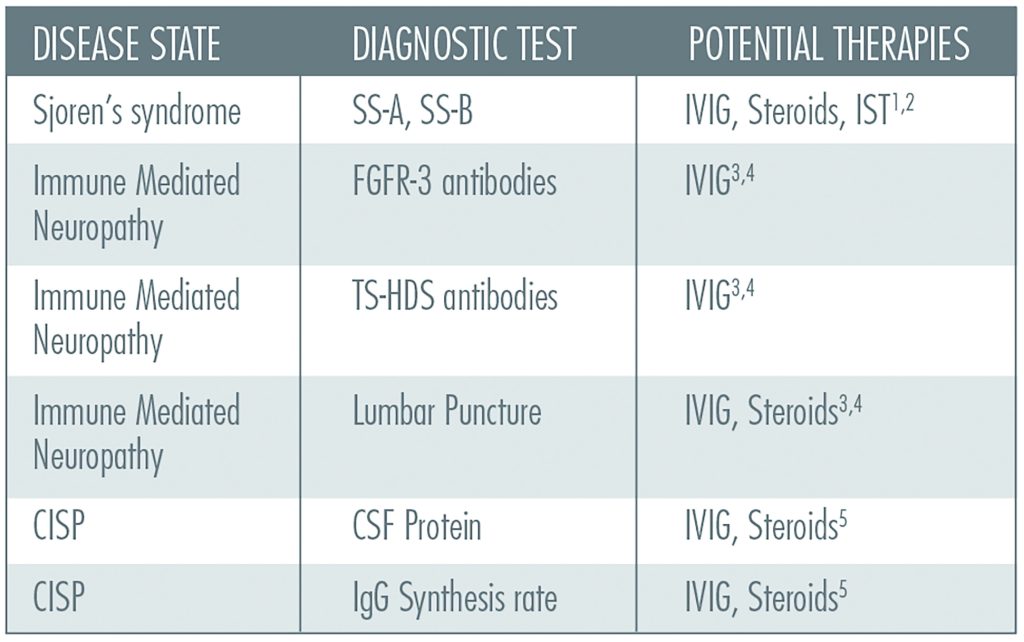
These ISFN phenotypes can predict the appropriate diagnostic tests to order and can lead to potential treatable diseases in 50% of the cases, which mirrors our diagnostic abilities (or lack thereof) in mixed fiber neuropathies
The patient’s description of where their symptoms are the worst may not correlate with the pathologic findings
Neuropathic Treatment Options
Abnormal biopsy predicts an 85% likelihood of responding to traditional neuropathic pain medications:
- Gabapentin
- Lyrica
- Cymbalta
- Amytriptiline
Can see improvement in IENFD in 6 months with:
- Metanx
- Glucose Control
- Exercise
- B12 Replacement
- Immune Mediated Therapies
Epidermal Nerve Fiber Density Biopsy Procedure
A cutaneous nerve/skin biopsy is a straightforward procedure performed in the outpatient setting, which takes 10 to 15 minutes. Generally, the skin heals within one to two weeks. The risk of bleeding or infection is extremely low. Please note, patients who are anti-coagulated with INR > 2.5 should not be biopsied.
Watch this tutorial video
Step 1:
Prepare the Area & Anesthetize
- Prepare the biopsy site with an alcohol swab and then anesthetize that area by injecting a solution of Lidocaine (HCL 1% and Epinephrine 1:100,000) just under the epidermis using a ½ cc syringe.
- The injection should continue until a “bleb” or bubble has formed under the skin greater than 3mm in diameter.
Step 2:
Biopsy the Skin
- Check the area to ensure the skin is properly anesthetized. A sensation of pressure is normal, but there should be no pain.
- Using a sterile 3mm skin punch, apply pressure and twist the tool side to side in a “drilling” motion until the blade of the skin punch has pierced the epidermis of the skin.
- The blade should be about ½ exposed. It is normal for the patient to experience pressure and twisting sensation but no pain.
- The primary purpose of the skin punch is to core a 3mm cylinder of skin. Once this has occurred, remove the biopsy tool, wipe off the area with a sterile 2×2 gauze to expose the biopsy site, and confirm a cylindrical “cookie-cutter” effect.
Step 3:
Remove the Skin Specimen, Part 1
- Once the skin has been cored and cleaned, the next step is to remove the specimen from the rest of the skin.
- Great care should be taken to avoid damage to the epidermis by crushing it with forceps or cutting it unnecessarily with scissors.
- The practitioner uses the forceps to grab the dermis of the cored skin from the side, pulls up the core to reveal excess dermis and sub-dermal fat, and uses the scissors to cut the cored skin free.
Step 4:
Remove the Skin Specimen, Part 2
- Do not pinch the top of the skin specimen. Always grab and lift from the side.
- Position the scissors under the forceps to cut the biopsy cleanly away without damaging any nerves at the epidermal layer.
- Once the biopsy has been removed from the skin, there will usually be some degree of bleeding in which pressure should be applied using a sterile 2” x 2” gauze.
Step 5:
Biopsy Site Care
- Cover the biopsy site with a standard pressure bandage.
- The site may continue to bleed minimally for the rest of the day and should form a scab within a few days.
- The site should not be submerged in water (i.e., no swimming, hot tubs, baths, etc.) for a few days.
- The bandage should be changed at least once a day and should be changed if it should become wet or damp.
- Once a substantial scab has formed, or new skin begins to grow over the area, and bleeding has stopped, the bandage can be removed.
Step 6:
Packing and Shipping Instructions
- Place biopsies into the provided fixative vials and label each vial indicating the patient name and biopsy site location.
- Place the vials back into the small biohazard zip lock baggy and then place the biohazard zip lock baggy back into the bubble pack.
- Complete the requisition form, including the patient demographics, insurance information, etc., and place this form back into the bubble pack.
- Place the Bubble pack into the FedEx shipping bag and attach the included FedEx pre–paid overnight shipping label to the bag. Please drop off or call your local FedEx station for immediate pickup.
- All additional paperwork in each kit is provided for the use and convenience of the practitioner and staff at their discretion including, patient consent form, billing form, and procedure notes.